Advanced Features: Tile Connection Rules
By default, DunGen tries to connect any two compatible Doorways that line up correctly. However, sometimes you need more control. You might want to prevent certain types of rooms from connecting directly (like two dead-end corridors) or enforce specific connection patterns (like ensuring puzzle rooms only connect to main halls).
DunGen provides Tile Connection Rules to achieve this level of control, offering two primary methods:
- Tag-Based Rules (Inspector): A simple, visual way to define rules based on tags you assign to your tiles. Configured in the Dungeon Flow asset.
- Code-Based Rules (Advanced): Allows you to write custom C# logic for complex connection scenarios, providing fine-grained control based on tile properties, doorway types, or even game state.
Method 1: Tag-Based Rules (Inspector)
This method uses DunGen's built-in tag system. You define custom tags, assign them to your Tile prefabs, and then set rules in the Dungeon Flow asset based on pairings of these tags.
Step 1: Define Tags

- First, you need to create the tags you want to use (e.g., "Room", "Corridor", "Puzzle", "Secret").
- Open the DunGen Tag Editor window via the Unity menu:
Window > DunGen > Tags. - Click "+ Add Tag" to create new tags. Give them meaningful names.
DunGen Tags vs. Unity Tags
These are DunGen-specific tags and are separate from Unity's built-in GameObject tags.
Step 2: Assign Tags to Tiles
- Select your Tile prefab in the Project view.
- Ensure it has a
Tilecomponent (DunGen adds one automatically if needed, or add it manually:Add Component > DunGen > Tile). - At the bottom of the
Tilecomponent inspector, find the Tags list. - Click the '+' button to add a tag slot, then select the desired tag from the dropdown menu.
- A single tile can have multiple tags assigned to it.
Step 3: Configure Rules in Dungeon Flow
- Select your
Dungeon Flowasset in the Project view. - Find the Tile Connection Rules section at the bottom of the Inspector.
- Mode: Choose how the rules are applied:
Accept: Tiles are only allowed to connect if both tiles have a tag that matches one of the defined Tag Pairs below. If a potential connection doesn't match any pair, it's rejected.Reject: Tiles are always allowed to connect unless both tiles have a tag that matches one of the defined Tag Pairs below. If a potential connection matches a pair, it's rejected.
- Tag Pairs: This list defines the specific tag combinations the
Modesetting acts upon.- Click the '+' button to add a new pair.
- Use the dropdowns to select the two tags for the pair (e.g., Tag A <-> Tag B). The order doesn't matter (
Room <-> Corridoris the same asCorridor <-> Room).
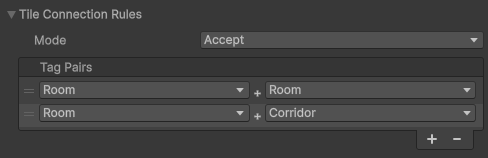
Examples:
- Scenario: Only allow Rooms to connect to other Rooms or to Corridors. Corridors cannot connect directly to other Corridors.
- Mode:
Accept - Tag Pairs:
Room<->RoomRoom<->Corridor
- Mode:
- Scenario: Prevent Corridors from connecting directly to other Corridors, but allow all other connections.
- Mode:
Reject - Tag Pairs:
Corridor<->Corridor
- Mode:
Method 2: Code-Based Rules (Advanced)
For rules that go beyond simple tag matching (e.g., checking specific doorway properties, tile components, or dynamic conditions), you can implement custom logic in C#.
This involves adding a delegate to a static list that DunGen checks during connection evaluation.
The Delegate and List:
- List:
DoorwayPairFinder.CustomConnectionRules- A static list where you add your custom rule methods wrapped in aTileConnectionRuleclass. Rules are evaluated in order based on the priority of the rules. Higher priority rules are evaluated first. -
Delegate Signature: Your method must match the
TileConnectionRule.TileConnectionDelegatesignature, which provides information about the potential connection:
Return Values (ConnectionRuleResult):
Your delegate method must return one of the following enum values:
ConnectionRuleResult.Allow: Explicitly allows this connection, overriding any subsequent custom rules or default logic.ConnectionRuleResult.Deny: Explicitly denies this connection, overriding any subsequent custom rules or default logic.ConnectionRuleResult.Passthrough: Your rule makes no decision about this specific connection. DunGen will proceed to check the next rule in theCustomConnectionRuleslist, or fall back to the default connection logic if no custom rules make a decision.
Adding/Removing the Rule:
- Add: Use
DoorwayPairFinder.CustomConnectionRules.Add(); typically inAwake()orStart(). - Remove: Crucially, you must remove your delegate when it's no longer needed (e.g., in
OnDestroy()orOnDisable()) usingDoorwayPairFinder.CustomConnectionRules.Remove(). Failure to do so can lead to errors if the delegate points to a destroyed object, or cause rules to persist unexpectedly between generations or scene loads.
Example Implementation
Let's say we have a set of large Tiles that we've tagged "Large" using DunGen's tagging system. We want to allow connections between two large Tiles only if both doorways use a specific "Large" DoorwaySocket asset, otherwise pass the decision to other rules.
using DunGen;
using DunGen.Tags;
using UnityEngine;

public class LargeTileConnectionRule : MonoBehaviour
{
    // This is the socket we want to use for large rooms. Set in the inspector
    public DoorwaySocket LargeSocket = null;
    // This is the tag we want to use to identify large rooms. Set in the inspector
    public Tag LargeRoomTag;
    // The priority of this rule. Higher numbers are evaluated first
    public int Priority = 0;

    // Keep our rule instance around so we can remove it later
    private TileConnectionRule rule;


    // Register our custom connection rule with the DoorwayPairFinder
    private void OnEnable()
    {
        rule = new TileConnectionRule(CanTilesConnect, Priority);
        DoorwayPairFinder.CustomConnectionRules.Add(rule);
    }

    // Unregister our custom connection rule when this object is disabled
    private void OnDisable()
    {
        DoorwayPairFinder.CustomConnectionRules.Remove(rule);
        rule = null;
    }

    // Our custom delegate for checking if two tiles can connect
    private TileConnectionRule.ConnectionResult CanTilesConnect(ProposedConnection connection)
    {
        // Check if the two tiles are large. This is using DunGen's tag system, but we could
        // have also checked the tile names, or looked for a specific component to identify large rooms
        bool previousTileIsLarge = connection.PreviousTile.Tags.HasTag(LargeRoomTag);
        bool nextTileIsLarge = connection.NextTile.Tags.HasTag(LargeRoomTag);

        // Are we interested in this connection?
        if (previousTileIsLarge && nextTileIsLarge)
        {
            // If both sockets are large, allow the connection, otherwise deny
            if (connection.PreviousDoorway.Socket == LargeSocket && connection.NextDoorway.Socket == LargeSocket)
                return TileConnectionRule.ConnectionResult.Allow;
            else
                return TileConnectionRule.ConnectionResult.Deny;
        }
        // We're not interested in this connection, pass it on to be handled later
        else
            return TileConnectionRule.ConnectionResult.Passthrough;
    }
}
When to Use Which Method
- Tag-Based: Ideal for simple, static rules based on broad categories of tiles (Room, Corridor, Theme A, Theme B). Easy to set up and visualize in the Inspector.
- Code-Based: Necessary for complex logic involving specific component checks, doorway socket types, comparisons between tile properties, or conditions based on dynamic game state. Offers maximum flexibility but requires C# scripting.
Using Tile Connection Rules effectively allows for more structured, predictable, and logically sound procedural dungeon layouts.