Optimization: Tile Pooling
Important Consideration
Enabling Tile Pooling requires careful management of object states within your Tiles. Objects might persist in an altered state (e.g., an opened chest) when a Tile is reused. See the Managing State section for more details.
What is Tile Pooling?
By default, when a Tile is no longer needed, it is simply destroyed. By contrast, with Tile Pooling enabled, Tiles are instead disabled and returned to the pool when they are no longer needed. This allows them to be reused later, avoiding costly instantiation of new Tile GameObjects.
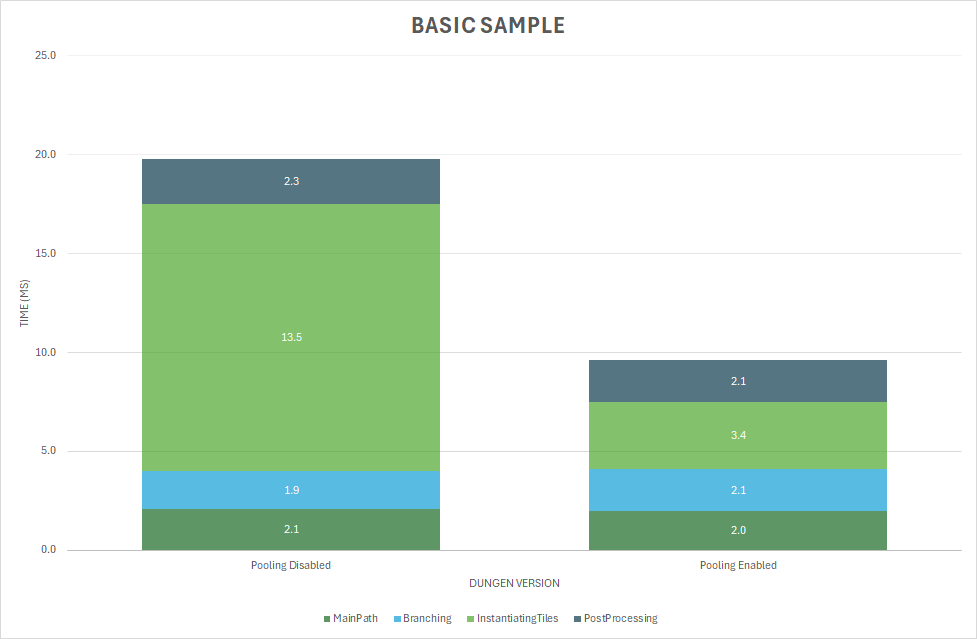
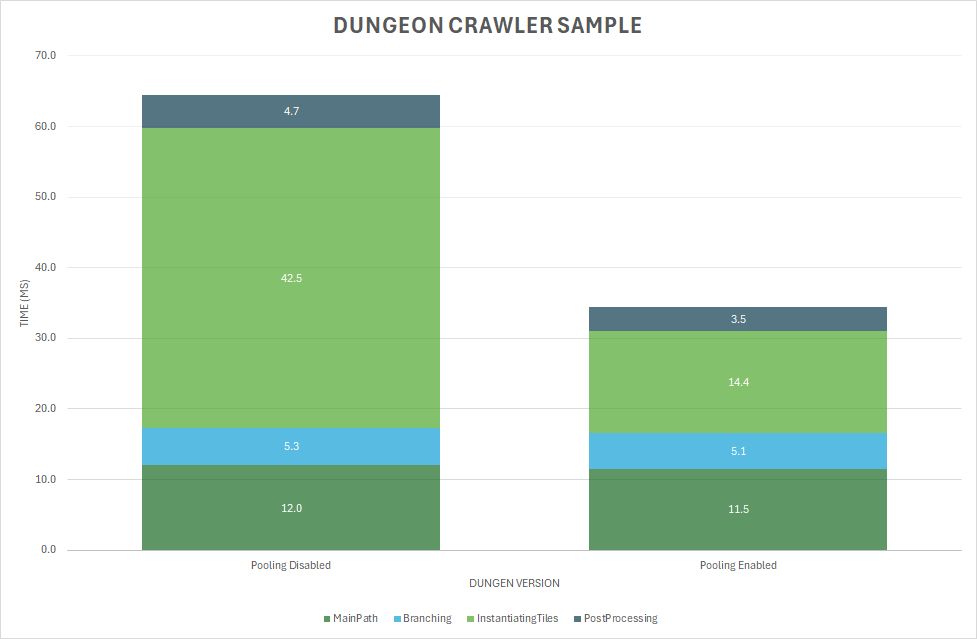
As you can see from the charts below, enabling Tile Pooling significantly speeds up dungeon generation, reducing time spent on instantiating tiles by as much as 70%.
Note
Tile Pooling will not improve the generation speed of the first dungeon you generate, as there will be no Tiles in the pool at that point. See the Pre-Warming the Pool section below to see how pooling can be used to improve first-run dungeons as well.
Enabling Tile Pooling
Tile Pooling can be enabled from the project settings (Edit > Project Settings... > DunGen). Under the 'Optimization' section, check the Enable Tile Pooling checkbox. That's it! DunGen will now reuse old tiles.
Pre-Warming the Pool
By default, Tile Pooling will only improve performance in subsequent dungeon generations, as there are no tiles yet in the pool for the initial generation. We can solve this by pre-warming the pool with some tiles that we will instantiate in the editor and save alongside the scene. We do this with the Tile Pool Preloader component.
Creating the Tile Pool Preloader
- Create a new GameObject in your scene
- Add the
Tile Pool Preloadercomponent (Add Component > DunGen > Pooling > Tile Pool Pre-loader)
Using the Pre-loader
The main area of interest in the inspector is the 'Tile Pool Entries' list. New entries can be added to the list by simply dragging DunGen assets (Tile, TileSet, Archetype, or DungeonFlow) from your project view onto the list. All Tiles in the asset will be extracted and put into the list.
Tile Pool Entries
Each entry in the list has two components:
- Tile: The Tile prefab we want to add to the pool
- Count: The number of instances we want to seed the pool with
Utilities
For ease of use, there is a 'List Controls' foldout at the top of the inspector which includes some tools for speeding up the process.
- Clear List (Button): Clears all entries from the list.
- Set All Counts: Type in a number and press the Apply button and the instance count for all tiles in the list will be set all at once.
Creating Instances
Clicking the Refresh Instances button will prompt you to confirm that you would like to instantiate the specified number of tiles, once you accept, it will update the Tile instances spawned inside your scene to match the chosen instance counts. Pressing the Clear Instances button will destroy all spawned Tile instances.
How Many Tiles Should I Pre-load?
The ideal number depends on your project's specific needs. A good starting point is to estimate the maximum number of each Tile type you expect to see in your largest possible dungeon configuration. Pre-loading enough to cover this means you might avoid runtime instantiation altogether, but will increase initial scene loading times and memory usage. Insufficient pre-loading means you still gain benefits but might occasionally instantiate new tiles at runtime if the pool runs dry. Experimentation is key to finding the right balance for your target platform and dungeon complexity.
Now, when DunGen generates a new DunGen on this scene, it will automatically pull in all of the Tile instances created by the pre-loader and put them into the pool, ready for use immediately.
Managing State
There is a major downside to enabling Tile Pooling to consider. Now that Tiles are reused, they will retain any changes made to them by the player. For example, if the player opens a treasure chest in the boss room, the next time that boss room is needed, the chest will still be open from before.
This means that any stateful object will either need to be:
- Spawned outside of your Tiles (ideally attached to the Dungeon root so it will be automatically cleaned up).
- Have their state reset when the Tile it's in is returned to the pool.
You can receive a callback on any object inside a Tile when its containing Tile is taken from the pool (spawned) or returned to the pool (de-spawned) by implementing the ITileSpawnEventReceiver interface. Implement the following functions:
// Called when the Tile instance containing this component is retrieved from the pool and placed in the dungeon
void OnTileSpawned(Tile tile);

// Called just before the Tile instance containing this component is disabled and returned to the pool
void OnTileDespawned(Tile tile);
Use OnTileSpawned or OnTileDespawned to reset the state of your interactive objects (e.g., close chests, reset enemy spawners, restore breakable objects) before the Tile is potentially reused.
Tile Pooling can be a powerful option for reducing dungeon generation times, but it requires a more thoughtful approach to designing Tiles with interactive elements.